


How to Make a Lake Pigment
- Alison Webb

- Feb 19
- 5 min read
Updated: Mar 3

What is a lake pigment?
Lake pigments are the result of taking water-soluble natural dyes and converting them into non-soluble pigments, which can be used to make a variety of art media.
Lake pigments are the base of most of my natural watercolor paints. They can also make pigment-based inks, chalk pastels, oil pastels, and oil paints.
Ingredients
Color-producing plant or mushroom
1 Liter of water
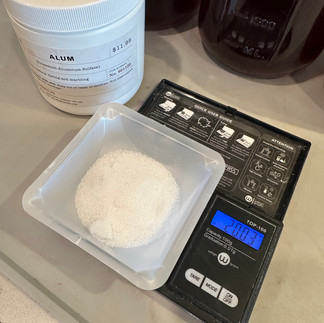
20 grams Potassium aluminum sulfate (alum) *
10 grams Soda Ash * (aka washing soda or sodium carbonate) OR 10 grams Calcium Carbonate *
*Please read all package safety information when working with dry, powdered chemicals. A particulate respiratory mask should be used.
Equipment:
Small digital scale (100-200 g capacity)
Weigh boat or paper
Coffee filters
Funnel
Stainless Steel dye pot, 2-3 Liter capacity
Stirring utensils
Mortar & pestle
Collecting your Materials
Plants, flowers, and mushrooms can be used fresh, dry, or thawed from frozen. Storage methods could have an impact on the final color. Be sure the material is dehydrated before sealing your container to prevent mold. For most of my collected plants and mushrooms, this works well. For some reason, my marigolds always mold in a sealed container regardless of how well they are dried. A dehydrator can be used, and it is my preferred method to dry mushrooms, which are more susceptible to molding. Keep the temperature low (110 degrees F or less) to protect the pigments. High heat can shift many pigments to brown.
Many dye-producing plants and mushrooms can be used to make a lake pigment. Below are some ideas to get you started, but they are not an exhaustive list.
Plants: Coreopsis, Cosmos, Marigolds, Common Tansy, Goldenrod, Weld, Madder root, Osage
Seeds & cones: Black Walnut & Alder cones
Mushrooms: Dyer's Polypore & Psisolithus arhizuz
Insect: Cochineal
Lichens won't produce a lake pigment
*A note about purple & blue plants. Anthocyanins are the primary pigment in many blue, black, & purple plants such as Black Hollyhock, Black Knight Scabiosa, berries, purple cabbage & carrots. Anthocyanins will change color with pH. In acids, they will shift to a pink range, and in a base, they will shift to a blue-green range. Making a lake will force these pigments into their base pH color range. So, pigment that started as a brilliant purple often results in a grayish blue after the lake process. Anthocyanin pigments also have very poor lightfastness compared to other pigments, and for these reasons, I typically do not make lake pigments from any anthocyanin sources.
How much material do I use for my lake pigments?
I use about 1/4 cup of dry, packed material for a 1-liter recipe, as described above. I typically make 4 liters at a time by scaling up these amounts 4x. There can be significant variation in the amount of pigment in different plants and mushrooms, but 1/4 cup is generally a good place to begin. Then, you can experiment with more or less material from there.
Working with fresh materials is excellent and can give more vibrant colors. You may want to make a rough estimate when using fresh materials since we can't always account for the exact water volume in fresh specimens. The more lake pigments you make, the better feel you will have for the amount of material you need.
Make a Dye Bath
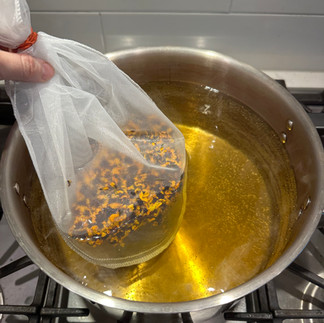
We first need to extract the color from our pigment source. Place your dried or fresh plants or mushrooms into a strainer bag. Alternatively, strain your liquid through a sieve before the next step.


Seal the top of your strainer bag with a rubber band and place it into 4 Liters of hot, but not boiling, water. The color will immediately begin to diffuse into the water. Keep the pot on low heat for 30 minutes, turn it off, and allow it to sit for another 30 minutes. You should have a very rich colored liquid at this point.


Adding the Alum
Pour your liquid into a container, or multiple containers, no more than half full. I used 4, 2 Liter mason jars, each holding 1 Liter of the dye bath. For this tutorial, I made a 4x batch; you will only have 1 Liter if following the recipe above.
While the liquid is still hot, add your alum and stir to dissolve. The alum will shift the color.


The alum is chemically bound to the dye molecules in the aqueous solution. The next step is to precipitate the alum-dye complex out of the solution so it is no longer water-soluble. We will add a base of sodium carbonate or calcium carbonate to do this. Each will have different effects on the final paint.
Adding the Carbonate
Measure and dissolve your carbonate with hot water in a small jar.
Sodium carbonate will create a more translucent and concentrated pigment. Your final dry pigment volume will be lower than if using calcium carbonate.
Calcium carbonate is chalk and will produce a more opaque pigment. It is considered a filler in art supplies, suggesting a dilution of the pigment's original qualities. However, there are some pigments (mostly yellows) for which I prefer calcium carbonate because the opacity brightens the pigment. I will demonstrate sodium and calcium carbonate so you can decide for yourself. Calcium carbonate is easier to work with; it precipitates faster, grinds & mixes easier, and dries faster in the paint pans. I prefer to work with calcium carbonate, but some pigments look better with sodium carbonate (reds, browns, & purples from cochineal)
This first video adds calcium carbonate (left) and sodium carbonate (right) to the alum-dye solutions. By first dissolving the carbonates in warm water, you can prevent a lot of foaming in this reaction.
Here is a timelapse of the solutions settling.
Filter & Rinse
Allow the solutions to sit overnight.
The aqueous solution should be separated on the top and the solid precipitate on the bottom. Carefully pour off as much of the top aqueous solution as possible. We now need to capture the solid precipitate and rinse it.
Rinsing the solution will dissolve any excess alum and carbonates, allowing you to discard them rather than capture them with the solid precipitate. If you notice white crystals forming on the perimeter of your dry lake pigment, this is a sign that your pigment needs to be rinsed more. There are two ways to perform the rinsing step: rinse in the jar or the filter. Both are explained below.
To rinse your precipitate in the jar:
After pouring off the aqueous solution, fill the jar with fresh water and stir. Allow the pigment to settle overnight and repeat this twice for three total rinses. After the final rinse has settled overnight, pour off the aqueous top solution again. Your pigment is now ready to be poured through a coffee filter.
To rinse in the filter:
Pour off & discard the top aqueous solution. Pour the pigment sludge into a coffee filter to capture the non-soluble pigment. Allow the excess water to drain through the filter. Pour fresh water onto the pigment in the filter and allow it to drain through the filter. Repeat this step 3 or more times. As the freshwater slowly trickles through the filter, it will take any excess alum or carbonates, which are water-soluble.
Dry
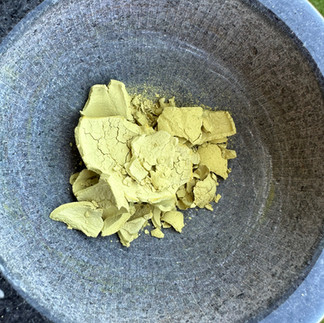
After rinsing your pigments, lay the coffee filters with wet pigment on a flat surface to dry. Keep these away from sunlight, but allow for plenty of fresh air. Below are the dry lake pigments extracted with calcium carbonate (left) and sodium carbonate (right). Notice the volume and opacity difference between the two extraction methods.


Grind
Once dry, pigments should be ground in a mortar and pestle and stored in a sealed container. You can also slide the coffee filters with dry pigment into a ziplock bag and grind them later.


Storage
Dry pigments should be stored in a dark container or cabinet to prevent UV light degradation.
Things you make with your lake pigments
Watercolor paints
Pigment-based inks
Pastels
Crayons
Oil Pastel
Oil Paint